
Creating a
bootable CD
Brought to you by
D0ug of #win2000 on EFNet
Before you start obtain the
following:
1. Latest version of CDRWin. You can get
it here http://www.goldenhawk.com/
2. .CAB files of the version of Windows 2000 that you want to
burn.
3. CD-ROM boot sector and CD Marker Files. You
can get it here. NeedFiles.zip
1. Extract the
.CAB files by running the
.EXE.
- For Windows 2000
Professional it will be X86_2183PRO_1.EXE.
-
For Windows 2000 Server it will be X86_2183SRV_1.EXE.
-
For Windows 2000 Advanced Server it will be X86_2183ADVSRV_1.EXE.
2. Make a temporary folder on your HD. I recommend and will use C:\CD throughout these instructions.
3. Move the I386 folder that was created by the .EXE you ran above into C:\CD.
4. Place the appropriate marker files from
above in C:\CD so Windows 2000 Setup can identify this CD as a setup
CD.
- The first file is
the same on all three versions of Windows 2000 is it is CDROM_NT.5.
-
The second file depends on the version of Windows 2000 are
burning.
Windows 2000 Professional is CDROM_IP.5.
Windows 2000 Server is CDROM_IS.5.
Windows 2000 Advanced Server is CDROM_IA.5.
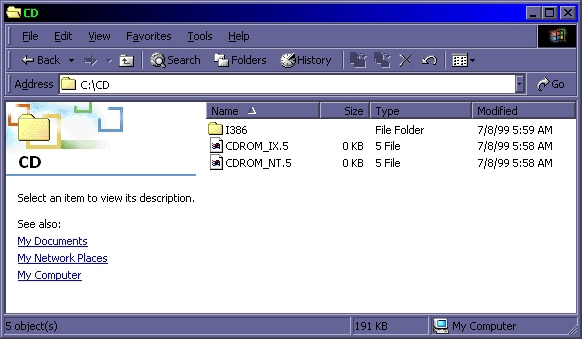
5. At this point your C:\CD dir should look
like this.

Note: In the image above, X in CDROM_IX.5 is replaced with P, S,
or A depending on the version you are burning.
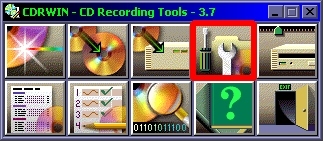
6. Open CDRWin and choose the File Backup and
Tools
option.

7. For Backup/Tool Operation choose how
you want to burn the CD. You can either have CDRWin create an .ISO
first
then burn it or CDRWin can burn the files on
the fly.
- If you want to
create a .ISO then burn choose Build and Record an ISO9660 Image
File.
- If you want to burn
the files on the fly choose Record Directories/Files directly to an
ISO9660 Disc (on the
fly).
![]()
OR
![]()
Note: I don't recommend burning on the fly if you have a slower computer. I have a Celeron 300a over clocked to 464MHz and I can burn on the fly with no problems. If you get a buffer under run while doing an on the fly burn then your computer is too slow to handle it. Go back and choose Build and Record an ISO9660 Image File.
8. In the Directories to Backup box put
in the folder you created in Step 3 by clicking Add... and browsing to the
folder.
- In the ISO9660 Image
File box choose a filename for the .ISO on a drive that will have room
for it. The .ISO will take
between 300MB-400MB depending on the version of Windows 2000 you are
burning.
- Under CDROM
Recorder your CD-R should already be chosen but make
sure.

Note: If you are doing an on the fly burn then leave
ISO9660 Image File blank.
9. Under Directory Options the following
should be chosen (this panel does vary with version 3.8c).

10. Under ISO9660 Options the following
should be chosen (this panel does vary with version 3.8c).

11. Under Recording Options the
following should be
chosen.

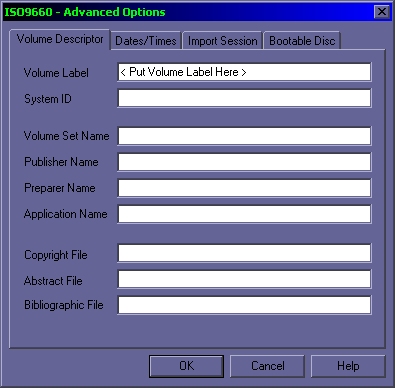
12. Click the Advanced Options button
and on the Volume Descriptor TAB put in one of the following as the
Volume
Label (this panel does vary with version 3.8c).
- For Windows 2000
Professional PRO_2183.
-
For Windows 2000 Server SRV_2183.
-
For Windows 2000 Advanced Server ADVSRV_2183.


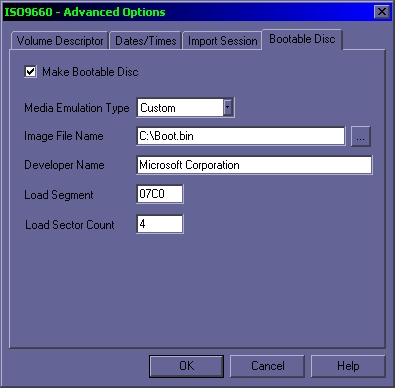
13. Choose the Bootable Disc
TAB
- Check off the Make
Bootable Disc box.
- For
Media Emulation Type choose Custom.
-
For Image File Name browse to where ever you saved BOOT.BIN.
-
For Developer Name put in Microsoft
Corporation.
- For
Load Segment leave as is.
-
For Load Sector Count put in 4.

14. Click OK then click START.

This information came from http://www.angelfire.com/de2/w2kcd/
Return to previous menu